Green Garlic Pesto

IMG_2431

I don’t ever really remember having much of a special weekend routine growing up. We never had the large family Sunday night dinner or weekend sleepover at the grandparent’s house. I hated  was terrible at any sport involving hand eye coordination so my parents, luckily or unluckily (not sure how you look at it), never spent their time shuffling me from one sporting event to the next.

I wasn’t really a structured kid.  I did homework laying on my back with my feet up the wall, I thought I invented the concept of procrastination and I had a crazy active imagination which got me in trouble more times than I can count.  Me and routine went together like pickles and peanut butter, both amazing on their own but when mixed together a terrible idea.  That is until I had my son.

IMG_2432

I never realized not having a routine was my routine, but it was. Now my not-a-routine turned into my son’s extreme not-a-routine. I was up at all hours of the night, trying to convince a 3 week old that the dark city outside our apartment window meant that he should be asleep too. I turned into an all you could eat buffet, open 24 hours a day, and it seemed most popular every time I sat down to have a warm meal myself. I started craving routine like I did deli sandwiches the second my OB told me I couldn’t eat them.  I was shocked by the realization but needed it badly.

Every baby book I read told me how much babies craved routine and I do not know what made me think that mine would be any different. Genetics I guess. But once we found our routine together, I secretly loved it.  I loved knowing the hours of the day I could sneak in a shower, get a nap, read a book or simply just be.  The hubby did too.

IMG_2433

A few months ago my son and I accidentally found our Sunday routine and I am not sure who loves it more. It does not revolve around sports or other organized activities, but a local farmer’s market and everything we can do within running distance. My son actually cried when we couldn’t go a few weeks ago. Genetics I guess.

About a month ago, we bought some green garlic and fresh basil at the farmer’s market, then came home to make homemade green garlic pesto for lunch.  I forgot to snag a pic of the recipe posted with the garlic so created this one from what I could remember of that recipe combined with an Everyday Italian pesto recipe. I couldn’t find the pine nuts in my fridge so subbed in walnuts instead.  The results, and I quote my son . . . delicious!

IMG_2434

Green Garlic Pesto

1/2 lb of green garlic, hard ends and tops of stems removed and cut into similar size pieces

2 cups (packed) fresh basil leaves

1/4 cup of toasted walnuts

1/2 tsp of salt

2/3 cup of extra-virgin olive oil

1/2 cup of freshly grated parmesan cheese

1/2 a lemon, juiced

In a blender pulse the garlic, basil, walnuts and salt until finally chopped.  With the blender still running gradually pour in the olive oil.  I found that I needed pretty close to the 2/3 cup of olive oil.  You want a smooth but medium consistency – not too runny and not too pasty.  I find if it is too thick it never thins out right with pasta water.  Transfer the pesto to a bowl and stir in the cheese.  Finish off with lemon juice.

Enjoy with your favorite pasta, ravioli or as a great spread on sandwiches.  If making with pasta, don’t forget to save a little pasta water to thin out the pesto.

IMG_2430

Oven Baked BBQ Ribs – Improving on Perfection

IMG_2352

I always thought I had a pretty good idea of the kind of parent I wanted to be, or at least I thought I did.  I had probably been keeping a mental list since I was four years old.  No I was not one of those girls with the baby dolls that knew since she was four that she wanted to be a mom and no judgment to you ladies out there who were.  I only wish I knew what I wanted to be when I grew up at four let alone 34!  But that is a whole different discussion.

I viewed every adult interaction around me as an interview for “could you be my mom or dad.”  Not that I was looking to fill a space or anything, I was perfectly happy with both but, you know, always curious if the grass was greener.

Lesson #1 I will never force my kids to eat foods they hate by mashing all of their food together in one lumpy, brown-gray, disgusting mess.  Yes this happened. No not to me. Might explain why I never slept over someone’s house . . .

Lesson #2 You are never too young to play with makeup.  Thank you Aunt S and the 1980s for allowing me to play endlessly with a ginormous box of eye shadow.  No embarrassing teenage make-up photos here, #lessismore.  Hair on the other hand . .

Lesson #3 Anyone under 10 should not decorate their room by themselves unless they get a do over at 14.  Love you Mom and probably thought you were the worlds best Mom when you let me and RaRa decorate our rooms when we were 8 and 4, respectfully.  The result a disaster mess of pink and wicker that I lived with all throughout high school.  No amount of Abosolut ads could cover those flower heart wreaths. I still don’t even know what I was thinking with the mismatched pink carpet!

Lesson #4 Your kid’s life is exactly that . . theirs, don’t use it as a do-over for yours. Of all the parental lessons I learned as a kid, this one was the biggest aha and took me the longest to realize.  I’ll be honest, sometimes I look at my son and am totally envious of the long and meandering path of life he has in front of him.  He can literally be or do anything he wants. Right now all he wants to do is be at a playground all day or on an airplane to Hawaii – both solid choices – but he does what makes him happy. My only ask is that happiness continue to guide his decisions. So many of us grown-ups forget to do what makes us happy.  Wouldn’t life be so much simpler?

So that is why I broke my family dinner rule this past Sunday night.  I knew if my son tried the BBQ ribs I was making he would love them but I also knew that getting him to try it would mean a ruined dinner for everyone.  Have you ever tried negotiating with a two-year old?  So I caved and made him the two-year-old equivalent to fall-off-the-bone-BBQ-ribs, a hot dog.  The result pure happiness . . . for everyone.

IMG_2353

Oven Baked BBQ Ribs 

Time: 3.5 hours

1 rack of baby back pork ribs

1 jar of your favorite BBQ sauce (I am loving TJs Sweet Carolina BBQ Sauce)

Preheat oven to 300 degrees

Place the rack of baby back ribs on a cookie sheet and cook, uncovered for 1.5 hours.  You can season the ribs with salt and pepper if you like. If your rack of ribs is small or lean I might cut back on this timing by 15 minutes to prevent from drying out.

Cover ribs and continue to cook for 1 hour.

Uncover ribs and slather in your favorite BBQ sauce (I generally only use 1/4 to 1/2 of a jar).  Return to oven, uncovered for another half an hour.

Cut and serve.

Note: I have done this with St. Louis style ribs and just increased the cooking time by half an hour – i cooked uncovered for 1:45 and covered for 1:15.

The Perfect Chocolate Cupcakes with Vanilla Icing

IMG_2018

As I sit writing this curled up on my couch, under my favorite blanket and wearing my fuzzy slippers, I can hardly contain my giddiness.  It is officially east coast fall weather in California and that just makes me beyond happy.

I made the move out west 7 years ago and I still find myself getting home sick for those cool, crisp, east coast fall days.  The days when you officially know it’s the end of skirt season and you obligingly cozy up in your favorite sweater, make a cup of hot chocolate and know it’s ok to spend the next couple of hours curled up on the couch with a blanket either reading your favorite book or watching your favorite movie.  Oh how I miss those days!  So when I get one out west I savor every single minute of it – even it means leaving my apartment window slightly open and refusing to turn on the heat so I get that little chill.

IMG_2016

Next week at this time I will back home on the east coast and can not wait for some real fall.  I also can not wait for Thanksgiving, my favorite holiday, and to be spending it in my favorite place, cooking with my mom in the kitchen I grew up in.

While it has been a crazy year, there is so much I have to be thankful for, especially one person in particular, our nanny.  Being a mom is the probably the hardest job I have ever taken on, but being a working mom just adds to the complexity.  When we brought our nanny into the family exactly a year ago, as I decided to make the decision to head back to work, I don’t think any of us knew what to expect.  To say she is now a part of our family is an understatement.  She literally keeps our home afloat, our son happy and gives the hubby and I complete peace of mind when we head out the door every morning.  I do not know what we would do without her and I just feel so incredibly lucky every day that she chose us as her “west coast family.”

Last month was her birthday and, while she had her real family out from the east coast to celebrate, I wanted to make sure she felt as special as she truly is.  I looked high and low for the perfect chocolate cupcake recipe and spent the night before her birthday preparing these beyond delicious from scratch cupcakes.

I know I usually type up the recipe below and add in my adaptations but this recipe was literally, beyond perfect.  I also want to give a fellow blogger her due credit.  If you haven’t already please check out Sally’s Baking Addiction – I think it has become my new addiction.

Here is a link to her perfectly, delicious chocolate cupcake recipe.

If you are a novice home baker like me and do not have a pastry bag, you can use a ziploc bag with the tip cut off to pipe out the icing.

Kale, Coconut & Tofu

IMG_1973

A few years ago, the hubby and I, on a whim, joined a CSA at a farmer’s market.  It was during the summer and the thought of getting farmer’s market fresh fruits and vegetables delivered to my apartment every week just made me giddy.  There is something intoxicating about being at a farmer’s market, walking from booth to booth checking out fresh produce, fruit, flowers, honey, home baked goods, etc.  It just sends me to a happy place.  If someone could box up that happiness, and have it waiting for me on my doorstep weekly when I got home from work, I was in.

When the shipments started showing up, I loved getting my weekly fix of fragrant basil, fresh picked peaches, juicy tomatoes and whatever else happened to be in season.  But as the air grew cooler, so did the variety in my CSA box, until weekly I came home to a box full of kale, chard and cabbage.

IMG_1958

IMG_1962

Before moving out to the west coast, I think I can probably count on one hand the amount of times I had had kale or chard.  I probably could not have told you the difference between them, let alone how to cook them.  I also had no idea what to cook with cabbage, aside from cole slaw or stuffed cabbage, and to be honest, still have no idea, but that is another post.

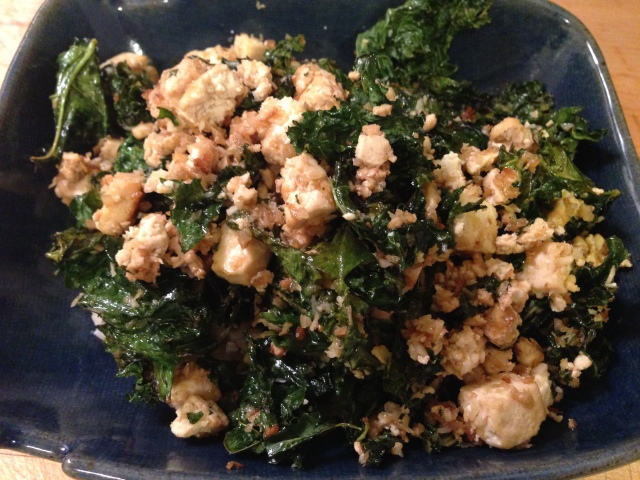
The hubby threw down an ultimatum, it was either let the CSA box go or start getting creative in the kitchen. He could not deal with another week of rotting leafy green vegetables in the refridgerator, and to be honest, neither could I.  Remembering those first summer shipments, and daydreaming about what those spring boxes could bring, I decided it was time to get creative.  It was then that I discovered our go-to household dinner – kale, coconut and tofu.

IMG_1965

IMG_1966

This recipe literally kept my husband and I fed weekly during the early months of parenthood.  I have made it so many times that it is now memorized and perfected.  Not only is it super easy to make but it is beyond delicious.

We have long given up the CSA boxes but I still find myself buying kale at the market every other week so the hubby and I can get our Kale, Coconut and Tofu dinner fix.

IMG_1970

IMG_1971

Kale, Coconut and Tofu

Serves 2

2 cups of cooked brown rice (I use the frozen rice for Whole Foods or Trader Joe’s)

1 bunch of kale

1/2 cup of shredded unsweetened coconut

8oz of extra firm tofu, drained, dried and cut into 1 inch cubes

1/3 cup of olive oil

2 tbsp of soy sauce

1 tsp of toasted sesame oil

Preheat oven to 350 and place the racks in the top and bottom 1/3 of the oven.

Rinse and dry the kale.  Remove the kale leaves from the stems and tear into 2 to 3 inch pieces (like you would for making kale chips).  Place in a large bowl.  Add the coconut and tofu.

In a separate smaller bowl whisk together the olive oil, soy sauce and toasted sesame oil.

Pour 2/3 of the olive oil mixture over the kale, coconut and tofu and toss.  Set the remaining 1/3 of the olive oil mixture aside.

Spread the kale, coconut and tofu mixture across two cookie sheets and place in the oven for 20 minutes, making sure to rotate the cookie sheets and mix the ingredients half way through.  (I also switch which rack the sheets are on due to heating differentials in my oven.)

When finished cooking, the tofu should be browned and the kale leaves crispy (depending on your oven it might be longer or shorter).  Remove the kale, coconut and tofu from the cookie sheets and place back in the large mixing bowl, toss with the remaining olive oil mixture and serve immediately in individual bowls over a cup of brown rice.

Adapted from Food and Wine magazine’s Kale, Coconut & Tofu

Mac & Cheese with Béchamel Sauce

Mac & Cheese

A miracle happened last night . . .  the hubby and I actually stayed awake to watch an entire movie! We rented Chef and if you haven’t seen it, it is a must in my book.  Yes the food is amazing but it was really the story that hit home for me, trying to find that perfect balance between your passions, your career and your personal life.  A struggle that I have grappled with, even before our little guy showed up.

Without giving too much of the premise away the main character is on a journey to find himself and what he used to love about cooking, as well as figure out a place for his family in that new life.  Sound familiar?  Beyond totally empathizing with the main character, I also took a way some key pieces of advice.

  1. Adding softened butter to the pan before making grilled cheese is a great technique for getting that lovely golden color.
  2. I need to go to New Orleans to have a Beignet.
  3. Sometimes you over think things and make them way more complicated then they have to be, but when you take a step back and see the simplicity in what you are trying to do, it just makes everything that much easier.

IMG_1890

Take mac & cheese for example.  I have this amazing recipe from the New York Times that I use religiously for making my mac & cheese to rave reviews from friends and family (I promise to share).  I excitedly whipped it up for my son’s first birthday because he LOVES himself some mac & cheese, but was left disappointed when it went virtually untouched.  While it is a pretty simple recipe in terms of executing, I can see how it could be a bit complex on the taste profile.

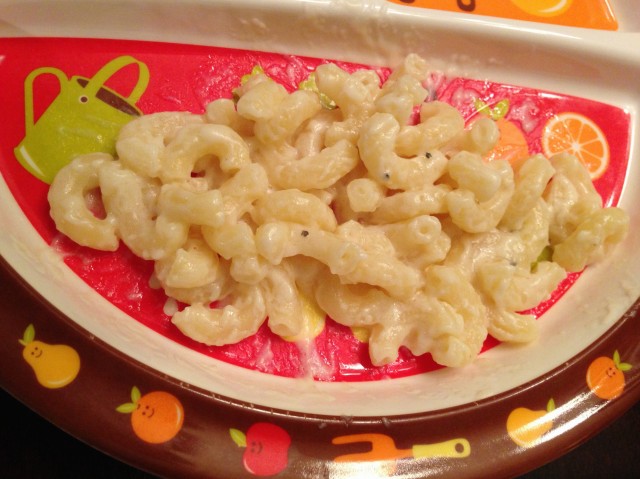
A few weeks ago I decided to try my luck at mac & cheese with him again. This time I went the simple route, not boxed mac & cheese, but the next best thing  . . . Béchamel Sauce.  So I feel totally crazy admitting this, but I have never really made a Béchamel sauce. I am not sure how I have been cooking this long and gotten away with it, but I have.

I can now safely say I will never be scared of Béchamel sauce again.  Not only was it super delicious, but it was also amazingly easy to make and a huge crowd pleaser with the little guy.  I scored a clean plate plus an ask for seconds.  If only figuring out how to find that perfect life balance was this easy.

Bechamel Sauce with Cheese

Makes half a cup

1 tablespoon of butter

1 tablespoon of flour

5/8 cup of milk, heated in a separate saucepan over low heat until small bubbles form at the edge

Salt

Freshly ground pepper

1/4 cup of cheddar cheese

Pinch of Cayenne Pepper


Melt the butter in a heavy bottomed sauce pan over medium heat.

Stir in the flour and cook, stir constantly, until the paste begins to bubble a bit – about 2 minutes.  Be careful not to let it brown.

Add in the hot milk and continue to stir, bringing the sauce to a boil.

Add the cheese, cayenne pepper as well as season with salt and pepper to taste.  Lower the heat and continue to cook, stirring constantly for 2 to 3 minutes.

Remove from heat and stir in your choice of pasta, I prefer elbow noodles for my Mac & Cheese.

Adapted from Epicurious.


Yellow Cake with Chocolate Icing

IMG_1736

This past weekend, the hubby and I spent hours chasing my son around a university campus I called home for two years.  A place grounded in traditions and full of so many memories for me, my sister and my two cousins who have all graduated (or will this spring) from there.  And now it is a town full of memories for my own son  – his first football game, his first ice cream pop and his first real word . . . blue.

IMG_1727

The hubby and I thought through a lot of things when we decided to start our family.  Do we move to the burbs or stay in the city? What kind of parents should we be? And the list goes on. But I don’t think either of us realized that we were really starting a family of our own, separate from the one’s we grew up with, and with our own traditions.  Some traditions we have stumbled on, like this past weekend, and others we have tried to force, unsuccessfully, like our staycation Christmas (never again!).


IMG_1728

When my son’s first birthday came around a few months ago, I initially was going to treat it like any other weekday. But as the day drew closer I knew that this day would never again be like any other day, nor should it be.  We had all survived our first year together and that was something to be celebrated, but more than that, it was something to remember and it got me thinking about traditions.

My birthday falls on a holiday weekend.  Growing up, we were rarely home, or if we were none of my friends were home to celebrate it with me.  I always felt special on my birthday but never really had any tradition tied to it.  My sister on the other hand always got a Carvel cake for her birthday with the chocolate crunchies and when I married my husband, my mother-in-law gifted me her recipe for his “birthday icing,” a recipe given to her from her mother-in-law. I loved this idea of a birthday tradition, probably secretly because I never had one of my own, and decided I was going to create one for my son.

IMG_1734

IMG_1735

When his birthday finally arrived, I took the day off from work to spend with him, taking him to a children’s museum and for a ride in his new toy car, but I also took it off to bake him his first cake.  The pressure was on to find the perfect recipe and I think I got pretty close. My baking skills were beyond rusty, failing to read the recipe in full before I started, which resulted in starting over a few times.  The result, however, was as close to perfect as I was going to get.  He devoured the slice we gave him and even asked for more. That was all I needed to know that I had successfully created a birthday tradition, well until he insists for birthday icing like his dad.

IMG_1736

Fluffy Yellow Layer Cake with Chocolate Frosting 

Serves 4

For the Cake:

1/4 cup cake flour (you can make with 1 cup of flour, remove 2 tbsp and substitute 2 tbsp of cornstarch and sift several times)

1/2 cup granulated sugar

1/2 teaspoon baking powder

1/4 teaspoon salt

1/3 cup buttermilk, at room temperature

3 tablespoons unsalted butter, melted and cooled slightly

2 large egg yolks, at room temperature

1 large egg white, at room temperature

1 tablespoon vegetable oil

3/4 teaspoon vanilla extract


For the Icing:

7 tablespoons unsalted butter, softened

1/3 cup confectioners’ sugar

1/4 cup Dutch-processed cocoa powder

pinch of salt

1/4 cup light corn syrup

1/2 teaspoon vanilla extract

3 ounces chocolate, melted and cooled slightly


Place rack in the middle position of the oven and preheat to 350 degrees

Grease and flour two 6-inch round cake pans, then line the bottoms with parchment paper.

Whisk the flour, 6 tablespoons of the granulated sugar, baking powder, salt and baking soda together in a medium bowl and set aside.

Whisk the buttermilk, melted butter, egg yolks, oil and vanilla together in a small bowl.

In a medium bowl, whip the egg white with an electric mixer on medium-high speed until foamy, 30 to 60 seconds.  Gradually whip in the remaining 2 tablespoons of sugar and continue to whip until stiff peaks form 2 to 3  minutes, scraping down the bowl as needed. Set aside.

Using an electric mixer on low-speed, gradually combine the butter mixture with the flour mixture until almost incorporated (a few streaks of dry flour will remain), 15 to 30 seconds.  Increase the speed to medium-low and beat until smooth and fully incorporated, 10 to 15 seconds longer.

Using a rubber spatula, stir one-third of the whipped egg white in the batter to lighten, then gently fold in the remaining egg white until not white streaks remain.

Divide the batter between the prepared pan, smooth the tops and gently tap the pans to settle the batter.

Bake for 16 to 18 minutes, or until a toothpick inserted comes out with a few crumbs attached.  Let the cakes cool in the pans for 10 minutes.  Run a knife along the end, flip them out on a wire rack, remove the parchment paper and then flip right side up.  Let cool for at least an hour and a half before icing.

To make the icing, process the butter, confectioner’s sugar, cocoa and salt in a food processor until smooth, about 10 seconds.  Add the corn syrup and vanilla and process until just combined, 5 to 10 seconds. Scrape down the bowl, then add the chocolate and pulse until smooth and creamy, 5 to 10 seconds.

To assemble place one of the cakes on a cake platter and spread 1/4 cup of the icing over the cake, right to the edges. Place the remaining cake layer on top and press lightly to adhere.  Frost the cake with the remaining icing.

From America’s Test Kitchen Cooking for Two 2009

Pasta with Mozzarella, Roasted Tomatoes & Eggplant

IMG_1803


So every woman probably makes the same promise to herself, her friends, her husband, her co-workers and probably anyone who will listen . . . “Just because I have a kid doesn’t mean anything has to change.”  I really did truly believe this and myself when I kept on repeating it over and over again.

Even after our son arrived, I kept thinking . . . “I can be my old self.”  I think it was probably my first week back at work as I sat pumping in a chair in a handicap bathroom stall, the smell of someone else’s morning bowel movement overwhelming me, that I realized something definitely had changed and then the automatic sensor light went off and I was left sitting in the dark.


IMG_1800

It was definitely a low moment and not because I was sitting in the dark, in a bathroom that wreaked of sh*t with a medieval torture device attached to my boobs but because the rest of the world hadn’t changed but, despite my insistence, I had.

Not only had I changed, I had turned into that woman I swore I would not.  I was so that mom, the one who showed off pictures of her son at work meetings, talked about the cutest things that he did despite the clear signs that the other person in the conversation had no interest, and could happily spend an hour discussing feeding and sleep schedules.  The worst part of all of this, is that secretly I love being that mom but hated that my old self got lost somewhere along the way.

IMG_1801


IMG_1802

So last weekend when the hubby skipped town to attend a wedding on the east coast, I found myself both excited and terrified to be alone with my 13 month old for 3 days.  I feared that I would be left exhausted and a shell of myself, trading everything that I might want or need out of a weekend for everything that my son needed.

In the end, it turned out to be one of my best weekends yet because I finally learned the art of balance.  It also might help that my love for food is rubbing off on the kid.  We had breakfast at a French bakery, hit up a local farmer’s market and lastly, cooked this delicious dinner together (ok we might have also squeezed in several hours of playground time and a birthday party).  By the way, I use the word “together” very loosely in that my son patiently watched while I prepped all the food and let me take breaks from play time to tend to it.

IMG_1805

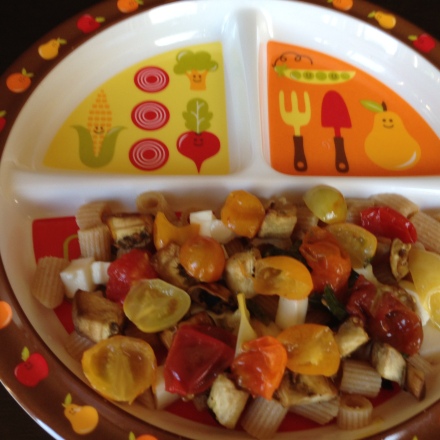
The best part was sitting down to dinner, just the two of us, and watching the look on his face as he devoured his dinner.  And then it hit me, my son might require a lot of love and attention but what he really needs most is a happy mom.

IMG_1804

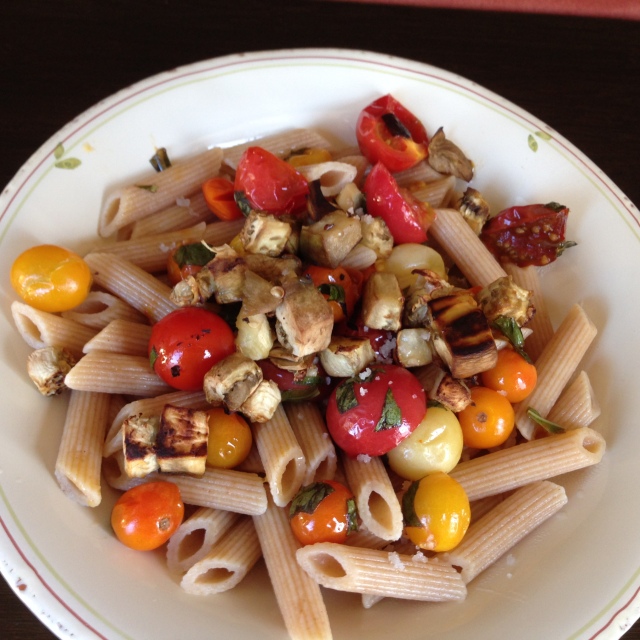
Pasta with Fresh Mozzarella, Roasted Tomato and Eggplant

Serves 2 to 3

1/2 lb of Penne pasta

1/2 of a large ball of fresh mozzarella (I think 4oz), diced

1 pint of cherry tomatoes, whole unless larger than a quarter than cut in half

1/2 of a medium eggplant, peeled and diced

6 to 7 fresh basil leaves, cut into strips

olive oil

salt

pepper


Preheat the oven to 400 degrees

Place eggplant on a plate and salt, leaving for at least 10 minutes (but ideally 30 minutes).

Place washed and dried cherry tomatoes in a medium bowl with 1 to 2 tbsp of olive oil (enough to coat), fresh basil leaves, salt and pepper.  Let sit aside marinating.

Toss eggplant with 1 tbsp of olive oil and place on a roasting pan. Cook for 20 minutes, flipping halfway through.

Place marinated tomatoes on a roasting pan and roast in oven for 10 minutes.

Meanwhile cook pasta according to directions.  Drain cooked pasta, reserving 1/2 a cup of pasta water.

Place diced mozzarella in the bottom of a pasta bowl, cover with pasta, roasted eggplant and cherry tomatoes.  Pour about 2 tbsp of pasta water over top, just enough to moisten pasta.  Sprinkle with a little gray salt and serve.

I like to mix up my pasta when I start eating so that the melting mozzarella at the bottom is incorporated into the dish.

You know something in your life has changed when . . .

Your stove at dinner time looks like this:

IMG_1068

Oh don’t get all judgmental. I am not knocking at all that this is what I made for dinner last night.  In fact, I am quite impressed that I actually cooked myself dinner last night and got to eat it warm, in a chair at a leisurely pace with my 8 week old successfully bathed and asleep in his crib and I did it all by myself with the hubby ditching us for a work meeting (no judgement there either :))


Rather I am more amused with what is boiling away on that back burner . . . the most amazing invention ever . . . the pacifier.  Unfortunately, this one met its fate with a city street yesterday. Fortunately for me we were only feet from our apartment, with a little man in a good mood and 2 replacements  upstairs – serious crisis averted. After that little scare I am sure you can imagine what is on its way from Amazon.


Needless to say my life has changed quite a bit in the few months I have been radio silent from the blog.  But don’t worry – the hubby and I haven’t gone hungry and we actually haven’t eaten too many meals like the one above or out of take out food containers.


Before our little man showed up, I was agonizing over how (and what) we would eat for dinner. Lucky for me he decided to make a late arrival leaving me with more than enough time on my hands to agonize over this dilemma (and everything else!).  I pre-made meals with my mom, collected take out menus from every possible restaurant I could find within walking distance of our apartment, and even researched meal delivery services.


Funny enough, we haven’t had to really use any of the above. For one I actually have one of those hubbies who knows his way around the kitchen pretty well and can whip up some pretty delicious dinners while I am making sure our little one is fed. Secondly we managed to find ourselves a handful of easy to make recipes that we rotate through quite often (yes I will share!).


One of those easy to make recipes on the rotation – sautéed spinach. It happens to be a super easy, fast and delicious green veg to add to any meal plus the pre-washed spinach serves as a great salad base for a quick meal for me during the day.


Garlic Sautéed Spinach

Serves 2


1 – 2 cloves of garlic, ends removed and sliced thin

1 tbsp of olive oil

3 cups of baby spinach

Salt to taste


Heat 1 tbsp of oil in a large sauté pan over medium heat.  When the oil is warm add garlic and let sizzle for 30 minutes, until fragrant (be careful not to let get brown).  Add spinach and salt to taste. Sauté until leaves are wilted.

If you want to change things up you can always spice it up with a little red pepper flakes or add an asian flavor with some toasted sesame oil.

Baking 201: French Apple Cake & Other Fun Treats

IMG_0453

A few days ago someone asked me of my first memory of my mom from childhood and I had to take a pause. I honestly could not remember. I have so many memories of time spent with my mom as a little girl. How do you decipher which one was your first? So I decided to answer the question, not as it was asked but, instead, how I will always remember my child hood with my mom and, of course, it involved time spent in the kitchen.

I didn’t find out until recently that before my sister or I were born my mom spent a lot of her free time taking cooking classes. She learned how to cook different cuisines from all over the world and even cooked a full-on chinese banquet for friends with everything from home made dumplings (yes the dough was from scratch) to kung pao chicken. I always knew my mom was a good cook but didn’t realize she had some serious skills.

IMG_0440

IMG_0441

As you get older it’s always fun to find out about your parents before you were born because, turns out, they did some pretty cool things. While I have never had the chance of experiencing my mom’s amazing chinese cooking skills, I will always remember the time I spent in the kitchen baking with her.

IMG_0442

IMG_0443

Until recently I never really did much baking on my own, but a few months ago I got bitten by the baking bug and have since whipped up many a treat. Maybe it was because I wanted a new challenge or maybe it was because I am baking a fun little treat of my own . . . in July I become a mom. I have heard that nothing prepares you for becoming a parent and my husband and I are preparing ourselves to have our world rocked but we are equally excited for what promises to be one crazy ride.

IMG_0446

IMG_0450

So I break my blogging silence for you today with one of the most favorite things I have baked in the past 6 plus months . . . a French Apple Cake. Cakes are definitely not my baking speciality and especially not ones that require a spring form pan but it sounded so delicious in my Cook’s Illustrated that I couldn’t resist. I know apple season is almost totally behind us but hopefully you can still find some granny smith apples in your grocery store to try this recipe out. It will not disappoint!

IMG_0451

French Apple Cake

(adapted from Cook’s Illustrated)

Serves 8 to 10

1 1/2 lb Granny Smith apples, peeled, cored, cut into 8 wedges, and sliced 1/8 in thick crosswise

1 tbsp Calvados (French apple brandy)

1 tsp lemon juice

1 cup plus 2 tbsp all-purpose flour

1 cup plus 1 tbsp granulated sugar

2 tsp baking powder

1/2 tsp salt

1 large egg plus 2 large yolks

1 cup vegetable oil

1 cup whole milk

1 tsp vanilla extract

Confectioner’s sugar

Adjust oven rack to lower-middle position and heat oven to 325. Spray 9-inch springform pan with vegetable oil spray and place on an aluminum foil wrapped rimmed baking sheet.

Place apple slices into a microwave safe pie plate, cover with paper plate and microwave until apples are pliable and slightly translucent, about 3 minutes. Toss apples with Calvados and lemon juice and let cool for 15 minutes.

Whisk 1 cup of flour, 1 cup granulated sugar, baking powder and salt together in a bowl. Whisk one egg, oil, milk, and vanilla together in a second bowl until smooth. Add dry ingredients to wet ingredients and whisk until just combined. Transfer 1 cup of batter to separate bowl and set aside.

Add egg yolks to remaining batter and whisk to combine. Using spatula, gently fold in cooled apples. Transfer batter to prepared pan; using offset spatula, spread batter evenly to pan edges, gently pressing on apples to create even, compact layer, and smooth surface.

Whisk remaining 2 tbsp of flour into reserved batter. Pour over batter in pan and spread batter evenly to pan edges and smooth surface. Sprinkle remaining 1 tbsp granulated sugar evenly over cake.

Bake until center of cake is set – a toothpick inserted into the center should come out clean and the top is golden brown – 1 hour and 15 minutes. Transfer pan to wire rack and let cool for 5 minutes. Run a paring knife around side of pan and let cool completely, about 2 to 3 hours. Dust lightly with confectioners’ sugar and serve.

Cheers to Fall


It is officially fall and as if on cue the leaves started falling from the trees, the pumpkin patches opened up, and the sun returned. Most San Franciscans live for fall, honestly I think it is what keeps us living in this city. The promise that after spending your summer freezing and literally living in a cloud, that you will have close to a month of the most beautiful, sunny 70 degree days.  Honestly, they truly are probably some of the most spectacular days and this weekend was no exception.

Our nights are still chilly though and the hubby and I have brought back the cocktail hour! The newness of my job working in the wine industry has started to fade and we decided that we wanted to mix up (no pun intended – I swear) the evening beverages.

Last year I sort of became obsessed with Manhattans. I am so not a Bourbon girl so this came as a bit of surprise to both me and the hubby. It was so cold outside one night and we were grabbing drinks with friends and I couldn’t imagine hitting up my go to gin. The only bone-warming-sounding drink on the menu was a Manhattan and it was like at first sip, it took me a few more dates to really fall in love.

So last weekend when the hubby and I settled in for a cozy night at home which equaled an on demand movie and roast chicken, the only drink that really seemed to fit the bill (aside from a delish bottle of red wine) was my beloved Manhattan. So for the first time in my kitchen I whipped them up and they were perfect.

Here’s to fall . . .

Manhattan

Serves 2

3oz    Bulliet Bourbon

1.5oz Sweet Vermouth

3 dashes  Aromatic Bitters

2-3 Luxardo Cherries

Chill 2 martini glasses. Combine bourbon, sweet vermouth and bitters in a mixing glass (or bottom or a shaker) filled with ice. Stir 41 times until properly chilled. Strain into martini glasses. Garnish with cherries. Enjoy!